One quick trip to the local hardware store later, I was ready. I brought it one of the shelves and talked to one of the very helpful guys there and he said it was definitely something that could be spray painted, but I'd need to use the Krylon paint that was made to adhere to different surfaces. Since Harper's room is light pink and chocolate brown, I picked up 3 cans of each color and headed home. The base was a breeze...the brown covered the icky dark gray quickly and evenly, 2 coats and I was done and let it sit in the sun to dry. Confident in my spray-painting abilities, I tackled the shelves with the light pink...and quickly realized it wasn't going to be as easy. Since the pink was so much lighter than the original color, it wasn't covering evenly at all and was looking splotchy. Also, I realized that with the pink/chocolate walls in her room, painting this the same exact colors was just too much. So I headed back to the hardware store...and found a perfect brighter pink that would go well with the existing colors, but add a little pop at the same time.
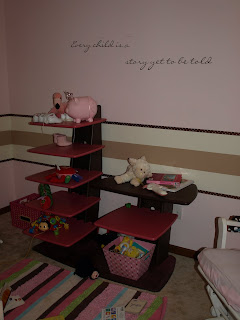
A few hours, and 3 coats of paint later, my shelves were done and looked great! We (and by we I mean my guys) hauled everything up 2 flights of stairs, to Harper's bedroom, and reassembled the shelving unit. It's perfect!!! We moved some furniture around and found the perfect spot, on the largest wall of the room under where we had placed the words "Every Child is a Story Yet to be Told". It seemed the perfect place to put the stuffed animals, toys and books that we'd gotten her, hoping to inspire her imagination.
Lessons learned:
1. Starting with a clean dry surface is very important.
2. Allow each coat of paint to dry completely, then wipe the surface down with a clean/dry cloth to get rid of any dust that might have collected during the drying process.
3. Paint the bottoms of your shelves/surfaces first. Since they aren't visible when it's assembled, it's a good place to test and see how heavy or light you'll need to apply the paint in order to get the coverage you are looking for.
4. Don't be afraid of color!!!
The top shelf hold her Ballerina Piggy Bank, and her many pairs of shoes. The rest of the shelves have assorted stuffed animals, books, toys, etc. She loves to take everything off the shelves, and thankfully is now learning how to put things back. I wish I could say it always stayed looking neat and organized, but, well, that just isn't the case. It does however, keep everything off the floor so things don't get stepped on and tripped over, which is exactly what I wanted. I also love how the "new" pink on the shelves matches the bright pink in the floor run that I'd picked up on clearance at Target, but wasn't convinced it looked right in the room. The shelves tied everything together perfectly!
I snapped a couple pictures tonight, I tried to put everything on it so it looked nice and neat, but of course Harper had other plans, and decided she wanted to be in the pictures as well. I think she adds a certain something to the pictures...don't you?


